Friday, April 30, 2010

Chicken Triangles

From: "Easy Cooking Step by Step," Bev Bennett. Woodbury, NY: Barron's Educational Series, 1985.

There's a reason you'll find this cookbook at every garage sale and thrift store. A lot of people liked the idea of a step-by-step cookbook but this cookbook doesn't really deliver - definitely not on the step-by-step aspect and not on quality of recipes. However, these chicken triangles are incredibly tasty and, although they require you to be something of a culinary construction worker, are worth the time they take.

The recipe suggests serving them hot or tepid. Don't be afraid of the word tepid. It just means you don't have to time everything perfectly so you can take them out of the oven the minute guests arrive. You can make these a few hours ahead and pop in a 200 degree oven to reheat for about 15 minutes and the flavor is even better than out of the oven the first time.
1 cup butter, melted (divided)
3 eggs, beaten
3 cups chopped cooked boneless chicken breast
1/4 teaspoon saffron dissolved in 1 tablespoons chicken broth (if desired, just use the broth)
1/4 teaspoon ground coriander
1/2 teaspoon ground nutmeg
3/4 teaspoon ground gingerroot
1 1/2 teaspoons ground cinnamon (divided)
3 tablespoons sugar (divided)

1/4 cup light or dark raisins
1/4 cup pine nuts
Salt and freshly ground pepper
16 sheets phyllo dough

Place 2 tablespoons melted butter in top of double boiler. Add beaten eggs and cook, stirring often, until mixture resembles slightly underdone scrambled eggs. Stir in chicken. Add saffron mixture, along with coriander, nutmeg, ginger, 1 teaspoon cinnamon, 1 tablespoon sugar, raisins, pine nuts and salt and pepper to taste. Mix well.

Preheat oven to 350 degrees.

Lay 2 sheets of phyllo dough, one on top of the other, on board or cookie sheet (keep remaining 14 sheets covered with slightly damp cloth). Brush generously with melted butter. Cut into 3 vertical strips. Place a heaping tablespoon of the chicken mixture in corner of one strip and fold into triangle, then continue folding into triangles all the way up the strip. Trim off excess. Press edges of dough in to seal using more butter. Place triangle on ungreased cookie sheet.

Repeat making triangles with remaining 2 strips. Then repeat the entire process 7 more times (using 2 sheets of phyllo for each, cutting each into 3 strips). You'll have 24 triangles in all.

Mix together the remaining 2 tablespoons sugar and remaining 1/2 teaspoon cinnamon. Brush triangles with remaining butter and sprinkle with sugar-cinnamon mixture. Bake for 20 minutes or until golden brown. Serve hot or tepid.

Tuesday, April 13, 2010

A few words about the Ov Glove


In a nutshell: If you don't have at least one Ov Glove, go out right now and buy one. One will lead to two. Everybody should have two.

It was Christmas 2008 and when my nephew handed me the gift that I'd eventually discover was the Ov Glove, I shook the box and said, "I hope this is Dance Dance Revolution." Don't laugh. I've heard that DDR is a lot of fun and good aerobic excercise.

When I opened the gift and saw it was the Ov Glove, I said, obviously disappointed, "Oh, it's the Ov Glove." My mom (who the gift was from) said, "Don't you want an Ov Glove?" I hadn't asked for an Ov Glove and my mom didn't own an Ov Glove about which she could be excited and want to give me, so, no, at that time, I did not want an Ov Glove.

But I soon became an Ov Glove convert and asked for Ov Glove #2 for Christmas 2009 (which, thank you very much, I received).

How can the Ov Glove improve your life? Let me count the ways.

#1 Even if you go Ov Glove Lite and just get one, your cooking life just became 100 times better. The burns you might have gotten through cloth potholders are now a thing of the past. Your cooking confidence will go through the roof.

#2 Two Ov Gloves are better than one. Your cooking life becomes 200 time better and there is no stove/oven anywhere that can intimidate you.

#3 Ov Gloves are more flexible than those crazy silicone oven pads and mitts, and offer the same (if not more) protection.

#4 If you quilt (doesn't everybody?) you know that you press/iron as much as you sew. And sometimes you steam press tiny little 1/4 inch seams open. It's an accident waiting to happen. But not with the Ov Glove! Although I don't recommend it, you can touch the iron plate wearing an Ov Glove without fear or pain.

There are probably more than four ways to love the Ov Glove (Ov love, I call it), but these are the reasons I profess my Ov love.

Go get one today!

Thursday, April 8, 2010

Sage Cookies


From: "Better Homes and Gardens The Ultimate Cookie Book." Des Moines: Meredith Books, 2007

What is it with me and sage? If I think about how prominent sage is in stuffing, I'm not much of a fan. But used in alternative ways, I'm in love with it. Just wait until I find the recipe that calls for sauteed fresh sage!

Don't let the ingredient combo in these cookies fool you. They are lovely, tasty cookies and the sage will surprise you. Its flavor is actually very subtle so it leaves you intrigued and wanting more.

As an extra bang for your buck, these cookies look impressive. If you're stumped for a costume at Halloween, put on khakis, an untucked shirt and carry a tray of these cookies and - voila! - you're Martha Stewart.

1 3/4 cups all-purpose flour
1/3 cup sugar
1/4 cup yellow cornmeal
1/2 cup butter
2 tablespoons snipped fresh, sage, lemon thyme or rosemary or 2 teaspoons dried sage or rosemary
3 tablespoons milk
1 egg white, beaten
1 tablespoon water
32 fresh sage leaves or lemon thyme leaves
Sugar

Preheat oven to 375 degrees. In a medium bowl stir together flour, sugar and cornmeal. Using a pastry blender, cut in butter until mixture resembles fine crumbs and starts to cling. Stir in sage. Add milk and stir with a fork until smooth. Divide dough in half.

On a lightly floured surface, roll half of the dough at a time until 1/8 inch thick. Using a 2 1/2 inch round or oval cookie cutter, cut out dough. Place cutouts onto an ungreased cookie sheet.

In a small bowl, stir together egg white and water. Brush cutouts with egg white mixture. Place one or two small sage leaves on each cutout. Brush leaves with egg white mixture. Sprinkle cutouts with sugar.

Bake about 7 minutes or until edges are firm and bottoms are very light brown. Transfer to a wire rack and let cool.

Friday, April 2, 2010

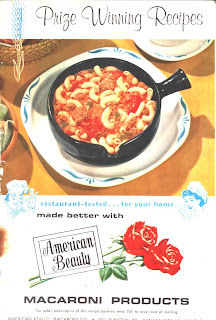
Apparently 1960 was a very unappetizing year


Was it the photography, lighting or print technology? Or were meals as unappetizing in 1960 as this cookbooklet would lead you to believe?

"Prize Winning Recipes" was published by the American Beauty Macaroni Co. in 1960 and promises that each recipe is "restaurant tested." It's sad enough that these dishes might have been served in somebody's home, but I can't imagine there was much hope for Americans if they were served some of these dishes in restaurants. No wonder a good-looking John Kennedy was elected to the presidency that year. America needed something easy on the eyes.


Take, for instance, the macaroni loaf seen here. The caption is a little confusing: "As prepared by Winning S. Pendergast School Lunchrooms, Detroit Public Schools." This is what was served in Detroit Public School lunchrooms during boom years. Can you imagine what kids are eating there now?

There's also baked salmon and shell macaroni au gratin, "A recipe tailor-made for Friday menus, using macaroni shells to create interest." Yeah, it's interesting all right.


No recipes with this post. I'm only keeping this cookbook as a novelty from a bygone era. However, if you're a school cafeteria employee and you'd like the macaroni loaf recipe, let me know.

Thursday, April 1, 2010

Beef Roast with Sweet Potatoes


From: "Better Homes and Gardens Biggest Book of Slow Cooker Recipes." Des Moines: Meredith Books, 2002.

I got this cookbook at a garage sale and I know two things: #1 why the owner was getting rid of it and #2 why she was only charging 25 cents. There are plenty of great slow cooker recipes out there, but this cookbook only seems to have one - Beef Roast with Sweet Potatoes. Other than that, it's about 400 pages of only slight variations on the boiled meat theme.

You definitely need the gravy that this recipe includes. And that's about all I can say about this recipe and this cookbook. Sorry - I wish I could be more enthusiastic about a boiled meat cookbook.

Wait - I do have one more thing: The sweet potatoes need to be in large chunks. The recipe calls for them to be quartered. Lean toward bigger sweet potato pieces, not smaller. Otherwise you'll have very mushy sweet potatoes.

1 2-pound boneless beef chuck pot roast
1 tablespoon cooking oil
1 medium onion, sliced
6 medium sweet potatoes or regular baking potatoes (or a mix of the two), peeled and quartered (about 2 pounds)
3/4 cup water
1 1/2 teaspoons instant beef bouillon granules
1/4 teaspoon celery seeds
1/4 teaspoon ground cinnamon
1/4 teaspoon pepper
2 tablespoons cornstarch (optional)
2 tablespoons cold water (optional)

Trim the fat from the pot roast. If necessary, cut roast to fit a 3 1/2- to 4-quart slow cooker. In a large skillet brown roast on all sides in hot oil. Drain well.

Place onion and potato(es) in cooker. Place meat over vegetables.

In a small bowl, combine 3/4 cup water, bouillon granules, celery seeds, cinnamon, and pepper. Pour over meat and vegetables. Cover; cook on low-heat setting for 8 to 10 hours or on high-heat setting for 4 to 5 hours.

Remove meat and vegetables from cooker and place on platter; reserve juices. If desired, for gravy, pour juices into glass measuring cup. Skim of fat. If necessary, add water to equal 2 cups liquid. In a saucepan stir cornstarch into 2 tablespoons cold water; add cooking juices. Cook and stir until thickened and bubbly. Cook and stir 2 minutes more. Serve gravy with roast and vegetables.

Serves 6